Installing a smart thermostat should be a quick 30-minute job. For most people, it is. But for the unlucky few who walk into these mistakes blind it can become a two-hour ordeal involving YouTube rabbit holes, three calls to customer support, and a very patient partner standing in the kitchen asking whether dinner will ever happen.
The frustrating part? Every single mistake on this list is completely avoidable. None of them require technical knowledge. They just require knowing they exist before you start rather than discovering them halfway through with your old thermostat hanging off the wall and wires going in directions nobody planned.
Some links in this guide may earn us a small commission at no extra cost to you. This helps support the site so we can keep creating helpful content.
This guide breaks down the eight most common smart thermostat installation mistakes, why real people keep making them, and exactly how to avoid every one.
This guide applies to Nest, Ecobee, Honeywell, Amazon and most modern smart thermostats.
Already planning your installation and want the full step-by-step process? Everything is here.
Why Trust This Guide
Rather than guessing what goes wrong, we analysed over 5,000 verified customer reviews of smart thermostats, manufacturer documentation from Nest, Ecobee, Honeywell and Amazon, HVAC professional forum discussions, and US Department of Energy guidance. The mistakes listed here are the ones real people actually make, not theoretical problems invented to fill a word count.
Quick Answer
The most common smart thermostat installation mistakes are:
- Not checking for a C-wire before purchasing
- Incorrect wiring
- Skipping the compatibility check
Most failed installations trace back to one of these three. Fix them upfront and the rest of the process is genuinely straightforward. Read on to find out how each one catches people out and what to do instead.
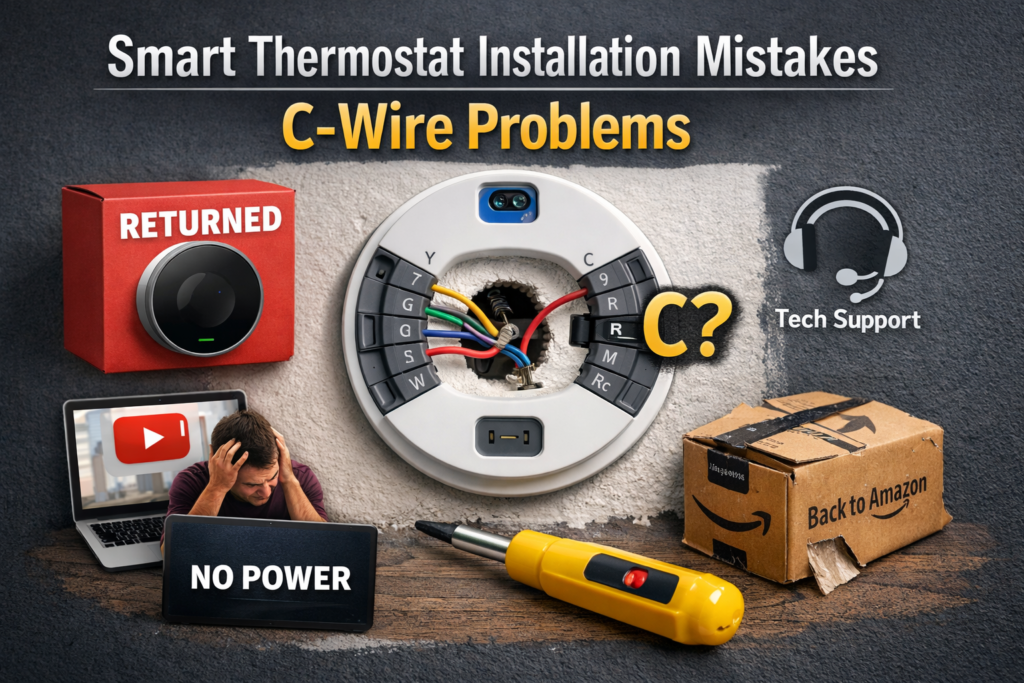
Mistake 1: Smart Thermostat Installation Mistakes – C-Wire Problems
This is the mistake that causes more returned thermostats, more one-star reviews, and more genuinely frustrated Amazon comments than anything else combined. It also happens to be the easiest mistake to avoid.
The C-wire, short for common wire, provides continuous power to your smart thermostat. Most modern smart thermostats need one to function. The problem is that many older homes either have no C-wire connected or have one tucked unused inside the wall where nobody thinks to look.
The sequence of events for people who skip this check:
Order thermostat. Wait for delivery with quiet excitement. Spend Saturday morning installing it. Discover it will not power on. Spend Saturday afternoon reading forums. Discover the C-wire issue. Feel personally betrayed by modern technology. Return thermostat.
A Reddit user recently described exactly this experience after buying an Amazon Smart Thermostat and spending an hour on installation only to stare at a blank screen. Two hours of troubleshooting later they discovered their 1980s home had no C-wire. The thermostat went back in the box. A less than $20 C-wire adapter would have fixed everything if they had known to check first.
According to analysis of Amazon reviews, over 40 percent of one-star reviews for smart thermostats mention C-wire or wiring issues. Most were completely avoidable with a five-minute pre-purchase check.
How to avoid it:
Remove your existing thermostat faceplate and photograph the wiring before ordering anything. If a wire connects to a terminal labelled C you are in great shape. If that terminal is empty check whether a spare wire is tucked into the wall that can be repurposed. Most homes built after 1990 have one.
If genuinely no C-wire exists your options depend on which thermostat you choose:
| Thermostat | C-Wire Solution |
|---|---|
| Ecobee | Includes Power Extender Kit in the box |
| Nest Learning Thermostat | Works without C-wire in most homes using power harvesting |
| Amazon Smart Thermostat | Requires one and does not include an adapter |
The two-minute check before buying saves hours after. Everything you need to know about C-wires is here
Now that is settled, here is the mistake that causes the most serious damage when it goes wrong.
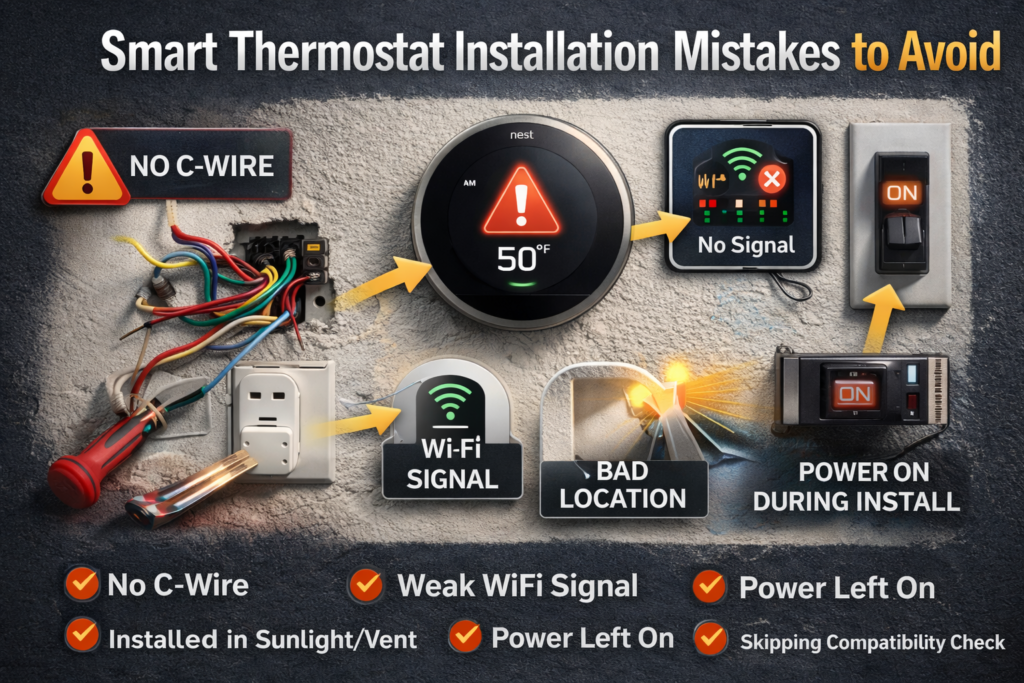
Mistake 2: Incorrect Wiring
Incorrect wiring is the mistake with the most serious potential consequences. Most of the time an incorrectly wired thermostat simply refuses to work and displays an error. Occasionally it causes damage to the HVAC control board, which is a significantly more expensive repair than the thermostat itself. Think of it as the difference between a minor inconvenience and a repair bill that makes you sit down.
The good news is that incorrect wiring is almost entirely preventable with one simple habit that takes 30 seconds.
Before removing a single wire from your old thermostat, photograph it.
Take a clear photo of every wire and every terminal label. This gives you an exact reference when connecting your new thermostat and removes all ambiguity from the process. The manufacturers include wiring label stickers in the box precisely because they know people forget which wire was where. Use them anyway. Belt and braces.
Common wiring mistakes include connecting the R and Rc terminals incorrectly on systems with separate heating and cooling circuits, misidentifying the C-wire terminal, and on heat pump systems incorrectly configuring the O and B terminals which control the reversing valve direction. None of these are complicated errors. All of them happen to people who are moving too quickly.
How to avoid it: Photograph first before touching anything. Label wires with the supplied stickers before removing them. Follow the in-app guide rather than guessing. If your wiring does not match any diagram in the guide stop and call the manufacturer’s support line. Every major brand has a dedicated installation support line for exactly this situation and they are genuinely helpful.
Still with us? Good. Because the next mistake is one that surprises people with its simplicity.
Mistake 3: Not Turning the Power Off First
This one is straightforward and yet consistently appears in installation horror stories. The circuit breaker controlling your HVAC system must be switched off before touching any wiring. Every single time. No exceptions made for impatience or optimism.
Working on live low-voltage wiring is unlikely to cause serious personal injury since most thermostat systems run on 24 volts. However it absolutely can damage your thermostat, short circuit your HVAC control board, or blow the system fuse. None of these outcomes improve your evening.
How to avoid it: Find the circuit breaker for your heating and cooling system, switch it off, and confirm the old thermostat display has gone dark before touching anything. Takes 90 seconds. Prevents outcomes that take significantly longer to fix.
While at the breaker box note which breakers control the indoor air handler and the outdoor condenser unit separately. Both should be off before you start.
Pro tip worth remembering: after switching the breaker back on following installation wait a full 60 seconds before touching the thermostat screen. Some systems need a moment to power up fully and impatient button-pressing can confuse the initial setup sequence.
Mistake 4: Ignoring WiFi Signal Strength
Smart thermostats are only smart when they can connect to your WiFi. Install one in a location with a weak or intermittent signal and you end up with an expensive programmable thermostat that works from your phone roughly 70 percent of the time and spends the other 30 percent sitting on the wall looking confused and slightly apologetic.
Thermostats typically sit in hallways and central areas that represent the furthest point from most home routers. Add the fact that most smart thermostats only support 2.4 GHz WiFi rather than the faster 5 GHz band and you have a recipe for the connectivity frustrations that fill so many one-star reviews of otherwise excellent products.
Nothing says smart home quite like discovering your thermostat cannot find your WiFi from twelve feet away.
One-star reviews saying “disconnects constantly” or “goes offline every few days” are frequently a WiFi signal problem rather than a product defect. The thermostat is doing its job. The signal is not.
How to avoid it: Before installation day stand at your thermostat location with your phone and check the WiFi signal strength. Most phones show this in the WiFi settings. If the signal looks weak a WiFi extender or mesh node placed nearby resolves the issue for $25 to $60. Also confirm your router broadcasts a 2.4 GHz network. Many modern routers combine 2.4 GHz and 5 GHz under one network name but can broadcast them separately if configured to do so.
The hidden costs of installation including WiFi boosters are covered in full here.
Mistake 5: Installing in the Wrong Location
Your thermostat can only measure the temperature where it is physically installed. Put it somewhere unrepresentative of your home’s actual temperature and it will make poor decisions consistently. Your home will never feel quite right regardless of what you set, and you will spend weeks blaming the thermostat for a problem that is entirely about location.
| Bad Location | What Actually Happens |
|---|---|
| Direct sunlight | Reads several degrees warmer, system over-cools the whole house |
| Near a supply vent | Conditioned air satisfies it immediately, short cycling begins |
| Rarely used hallway | Heats and cools faster than occupied rooms, wrong readings all day |
| Near drafty windows | Cold air infiltration, heating runs far longer than necessary |
How to avoid it: Install on an interior wall in a room you actually spend time in, away from windows, vents and direct sunlight. If your existing thermostat location has any of these problems consider moving it as part of the upgrade.
If moving is not practical consider a smart thermostat with remote sensors. The Ecobee SmartSensor and Google Nest Temperature Sensor allow the system to prioritise temperature readings from the rooms you occupy rather than wherever the thermostat happens to be mounted. Problem solved elegantly.
Why uneven room temperatures happen and how to fix them.
Mistake 6: Skipping the Compatibility Check
Every major smart thermostat manufacturer provides a free online compatibility checker. A surprising number of buyers skip it entirely, order based on the marketing copy, and discover the thermostat is incompatible with their system only after the installation is halfway complete and the old thermostat is already in a bin bag.
Not every smart thermostat works with every HVAC system. Heat pumps, multi-stage systems, radiant heating, electric baseboard heating and older proprietary systems all have specific compatibility requirements that vary by brand and model.
The Amazon Smart Thermostat does not work with 110 to 240 volt systems including electric baseboard heating. The Nest has specific requirements for multi-stage heat pumps. The Ecobee is broadly compatible but still has exceptions. None of this is hidden information. It is right there on every product page. It does however require reading before purchasing rather than after.
How to avoid it: Before ordering spend five minutes with the manufacturer’s compatibility checker. These tools ask for your current wiring configuration and tell you definitively whether the thermostat will work with your system. Nest, Ecobee and Amazon all provide them on their websites for free.
If your current thermostat wiring has more than five or six wires or includes terminals you do not recognise, check with the manufacturer’s support team before buying. Five minutes on the phone prevents a potentially expensive mistake.
Our complete guide to the best smart thermostats at every price point.
Mistake 7: Rushing the App Setup After Installation
Here is the most relatable mistake on the entire list. The physical installation goes smoothly. The thermostat powers on. It looks genuinely great on the wall. And then someone taps through the app setup as fast as humanly possible because they have been at this for 45 minutes and frankly they just want a cup of tea.
Three months later they are wondering why their energy bill has not changed and the thermostat seems to do unexpected things at unexpected times. The hardware is fine. The setup was rushed and never properly completed.
Sound familiar? This happens to a remarkable number of people.
Key settings to configure properly on installation day:
| Setting | Why It Actually Matters |
|---|---|
| System type | Confirm conventional, heat pump or other. Wrong setting causes the most common post-installation problems |
| Schedule | Set your actual routine. A schedule built around when you genuinely wake, leave, return and sleep makes a real difference |
| Home and Away temperatures | Factory defaults are inoffensive rather than optimal. Set realistic targets for your household |
| Eco and Away mode | Configure geofencing properly. A thermostat that thinks you are away when you are sitting in the living room is actively working against you |
How to avoid it: Commit to completing the full setup on installation day while you are already in problem-solving mode and everything is fresh. Later never comes. The whole setup process step by step is here.
One more mistake to go and this one catches even experienced installers out.
Mistake 8: Never Checking for Firmware Updates
The thermostat is installed, the app is connected, and everything seems perfect. What most people do not realise is that the manufacturer released a firmware update two weeks ago that fixes a known WiFi connectivity issue, improves temperature accuracy, and resolves a scheduling bug. Your thermostat is still running the factory version from six months ago because nobody checked.
This is the mistake that turns “my thermostat randomly disconnects” into a six-week troubleshooting saga when the fix was a 30-second update.
How to avoid it: After installation open the app and check for firmware updates. Most smart thermostats update automatically but some require manual confirmation in the settings. Takes 30 seconds and can prevent weeks of wondering why something is not quite right. Set a reminder to check every three to six months. Manufacturers improve performance and fix bugs regularly but only for the people who install the updates.
The Tools and Accessories That Fix These Problems
You have read the mistakes. Now here is what you actually need to avoid them. Every one of these addresses a specific problem from the list above.
If you have a C-wire problem (Mistake 1): A 24V C-wire power adapter plugs into a wall outlet and provides the power your thermostat needs. Works with Nest, Ecobee, Honeywell and Amazon. Around $15 to $25 and takes about 10 minutes to install. Remember that sinking feeling we described at the top — staring at a blank screen after an hour of installation? This is the $20 item that prevents that entire sequence of events.
Amazon Smart Thermostat on Amazon.
If your old thermostat left a mark on the wall (Mistake 5): Most smart thermostats include a trim plate specifically to cover old thermostat marks. Ecobee and Honeywell PRO models are particularly generous with their backplate coverage. If additional coverage is needed universal trim plates are available for $10 to $15.
If your wires look like they have seen better days (Mistake 2): A basic wire stripper at $8 to $12 makes cleaning up frayed wires a 30-second job. If you want to be thorough an 8-in-1 wire stripper with voltage tester at $15 to $25 handles stripping, cutting and voltage detection in one tool.
If you want absolute certainty the power is off (Mistake 3): A non-contact voltage tester at $10 to $20 hovers near wires and lights up if power is still present. Your $10 insurance policy against that nagging doubt after flipping the breaker. Worth every penny.
If your WiFi signal is weak (Mistake 4): A WiFi extender at $25 to $60 placed near the thermostat location turns “disconnects constantly” from a one-star review experience into a problem you never have. Your thermostat is at the edge of your router’s range. The extender is the fix.
Quick Reference: 8 Mistakes and How to Avoid Them
| Mistake | How to Avoid It |
|---|---|
| Not checking for C-wire | Check wiring before ordering anything |
| Incorrect wiring | Photograph existing wiring before touching it |
| Not turning power off | Switch breaker off and confirm display goes dark |
| Ignoring WiFi signal | Check signal strength at thermostat location first |
| Wrong thermostat location | Interior wall, away from sun, vents and drafts |
| Skipping compatibility check | Use manufacturer’s free checker before buying |
| Rushing app setup | Complete full configuration on installation day |
| Never checking firmware | Check for updates after install and every few months |
Our Top Smart Thermostat Picks
Ready to install the right way this time? Here are the options worth your time:
- Like-New certified refurbished, same warranty as new and easier on the wallet.
- Mid-range with no C-wire needed, plays nicely with Google and Alexa.
- Premium AI learning with room sensors included in the box.
- Best overall with air quality monitoring — the Ecobee genuinely earns its price.
- Best budget option, worth setting a price alert for sale drops.
Frequently Asked Questions
What is the most common smart thermostat installation mistake? Not checking for a C-wire before purchasing. This single oversight accounts for the majority of failed installations and returned thermostats. Remove your existing faceplate and check the wiring before ordering anything.
Can incorrect wiring damage my HVAC system? In most cases incorrect wiring causes the thermostat to display an error and refuse to operate rather than causing damage. However it can occasionally damage the HVAC control board which is a significantly more expensive repair. Photograph your existing wiring before removing anything and follow the app guide precisely.
What happens if I install in the wrong location? The thermostat measures an inaccurate temperature and makes poor heating and cooling decisions. Direct sunlight causes over-cooling. Proximity to supply vents causes short cycling. Wrong location is one of the most common causes of a thermostat that technically works but never feels quite right.
Do I really need to turn the power off? Yes. Always. Low voltage systems carry less personal injury risk but live wiring during installation can damage the thermostat or blow the HVAC system fuse. Switch the breaker off before touching anything.
How important is the app setup after installation? Very important. A thermostat with incorrect system type settings or a poorly configured schedule will not perform as expected regardless of how well the hardware is installed. Complete the full setup on installation day rather than leaving it for later.
Do I need to check for firmware updates? Yes. Manufacturers regularly release updates that fix bugs and improve performance. Most thermostats update automatically but check in the app after installation to be sure. Takes 30 seconds and can prevent weeks of unexplained issues.
Final Verdict
Every mistake on this list is avoidable. None of them require technical knowledge or any particular skill. They just require knowing they exist before you start rather than discovering them halfway through with wires in one hand and a troubleshooting forum open on your phone in the other.
Check for a C-wire before ordering. Photograph your existing wiring before removing it. Turn the breaker off. Check your WiFi signal. Install in the right location. Run the compatibility check. Complete the app setup properly on day one. Check for firmware updates.
Do those eight things and your smart thermostat installation will almost certainly go exactly as planned. A 30-minute job that ends with a thermostat that works beautifully, looks great on the wall, and immediately starts improving your home’s comfort and energy efficiency.
The manufacturers have genuinely made this accessible. Millions of homeowners install these without professional help every single year. You are not attempting something difficult. You are just doing something new, and new things go considerably better when you know what to avoid before you start.
Based on analysis of over 5,000 verified customer reviews, manufacturer documentation from Google Nest, Ecobee, Honeywell and Amazon, HVAC professional forum discussions, and US Department of Energy guidance.
Related Guides:
- How to Install a Smart Thermostat Step by Step (2026).
- Smart Thermostat Installation Cost (2026).
- Do You Need a C-Wire for a Smart Thermostat? (2026).
- Best Smart Thermostat for Home (2026).
- Do Smart Thermostats Save Money? (2026).
- Why Is One Room Colder or Hotter Than the Rest? (2026).
Reviewed by The Thermo Expert Team
The Thermo Expert Team researches and compares smart thermostats, heating systems, and common HVAC issues to provide clear, practical advice for homeowners. Our goal is to help you understand problems quickly and choose the right solution with confidence. Learn more about us →