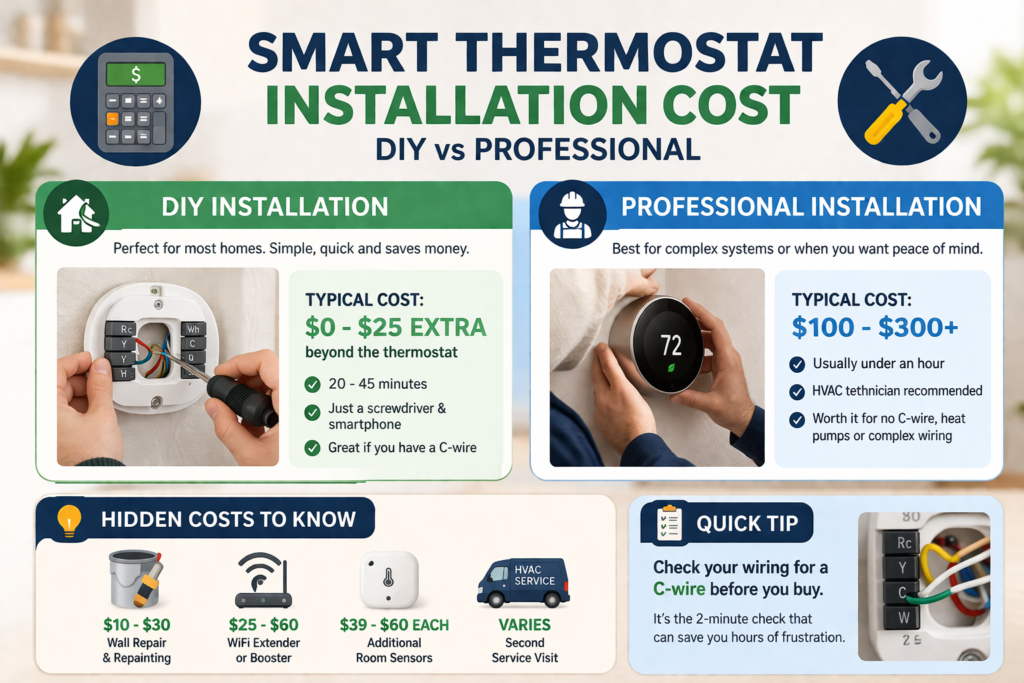
Smart thermostat installation cost ranges from $0 to $300 depending on whether you install it yourself or hire a professional. That is quite a range. The difference comes down to one question: are you the person who installs things themselves, or the person who calls someone who installs things?
Neither answer is wrong. If you are researching smart thermostat installation cost, the biggest factor is whether you go DIY or hire a professional. The honest truth is that the vast majority of homeowners can do this in 30 minutes with a screwdriver and a smartphone. A smaller number genuinely need professional help and that is perfectly fine too.
What nobody tells you upfront is where the hidden costs lurk. That is what this guide is actually for.
Some links in this guide may earn us a small commission at no extra cost to you. This helps support the site so we can keep creating helpful content.
This guide applies to Nest, Ecobee, Honeywell, Amazon and most modern smart thermostats.
Already shopping and want to skip straight to the product comparison? Everything is here.
Quick Answer
Smart thermostat installation cost ranges from $0 to $300 depending on whether you install it yourself or hire a professional:
| Installation Type | Typical Cost |
|---|---|
| DIY with existing C-wire | $0 labour |
| DIY without C-wire, adapter needed | $15 to $25 extra |
| Professional HVAC installation | $100 to $200 |
| Professional electrician | $150 to $300 |
| Complex system or full rewire | $200 to $500+ |
For most homeowners DIY installation costs nothing beyond the thermostat itself. The situations where professional help is genuinely worth the money are very specific and all covered below.
But first, there is one thing to check before buying anything at all. Skip this and you will regret it.
The C-Wire Situation (Read This Before Spending a Penny)
Here is the piece of information that would have saved thousands of Amazon reviewers a very stressful afternoon.
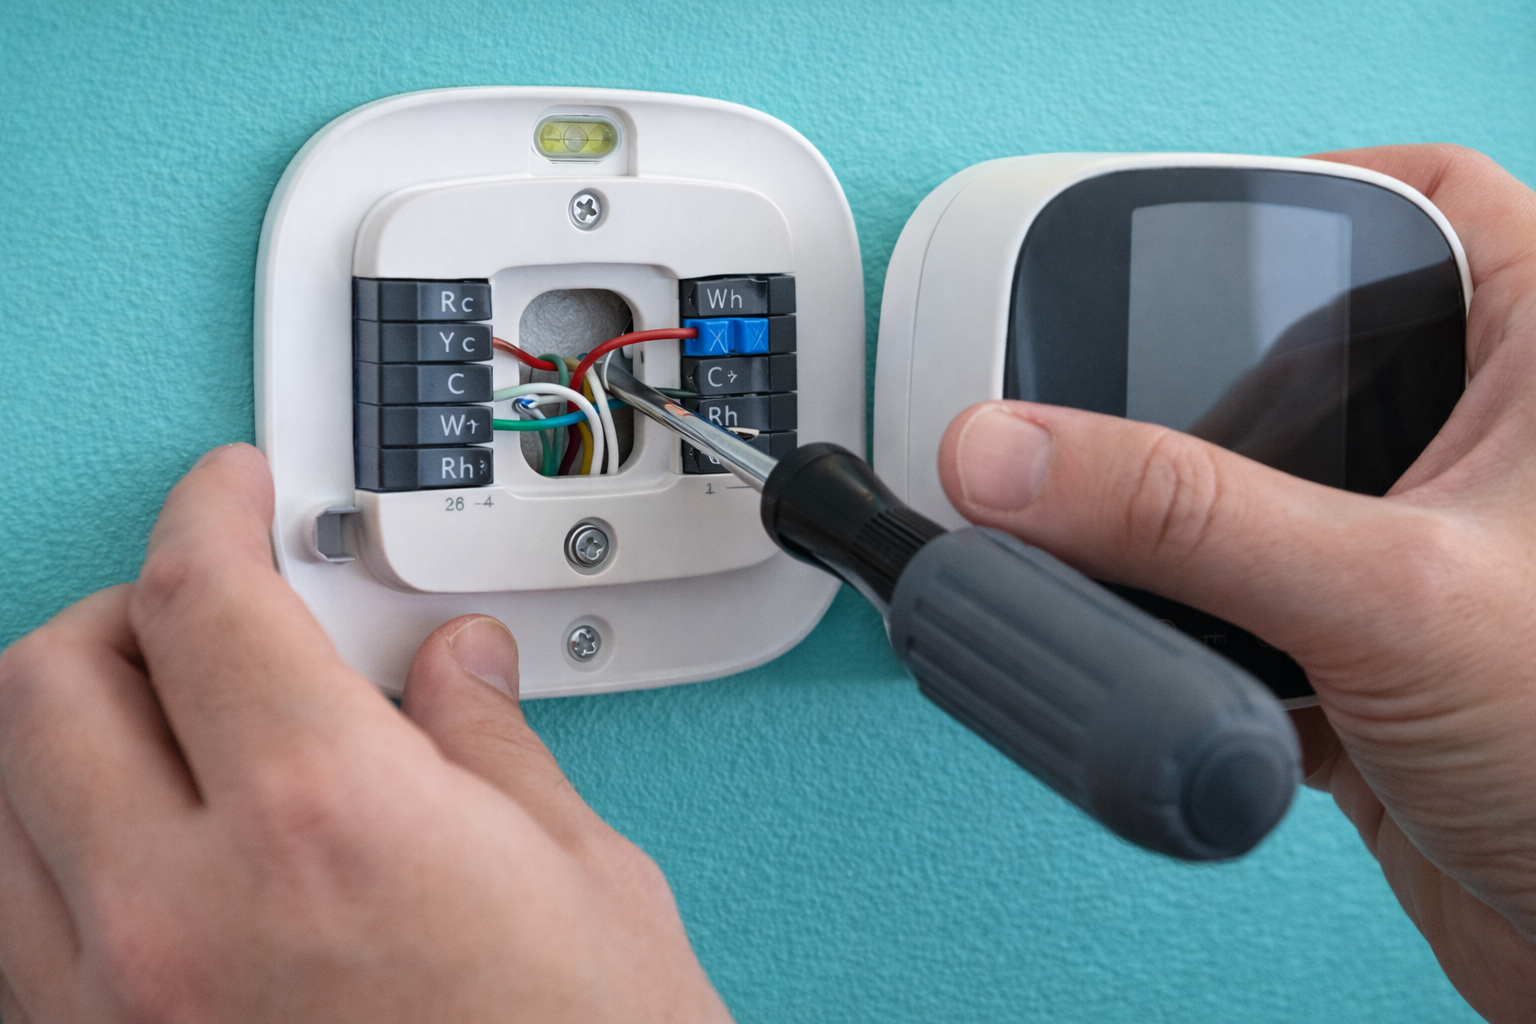
Before ordering a smart thermostat, remove your existing thermostat faceplate and look at the wiring. If a wire connects to the terminal labelled C you are in great shape. If that terminal is empty you need to know your options before clicking buy.
Think of it as the two-minute check that separates a satisfying Saturday project from a three-hour spiral of YouTube troubleshooting videos. Worth doing every single time.
No C-wire? Here is what you can do:
| Option | Cost | Difficulty |
|---|---|---|
| Buy a thermostat with adapter included | $0 extra | Easy — Ecobee includes Power Extender Kit |
| Buy a separate C-wire adapter | $15 to $25 | Easy — adds about 10 minutes |
| Have a professional run a new wire | $75 to $150 | Leave this one to the pros |
The Nest Learning Thermostat handles most homes without a C-wire using its own power harvesting technology. The Ecobee includes everything you need in the box. The Amazon Smart Thermostat requires a C-wire and does not include an adapter, which is the most common complaint in its one-star reviews. People who check this first have a completely different experience from those who do not.
The good news: most homes built after 1990 have a spare wire sitting unused in the wall that can be repurposed as a C-wire. Worth checking before assuming you need professional help.
Everything about C-wires explained properly here.
Now that the most important thing is out of the way, here is what installation actually costs.
Smart Thermostat Installation Cost: DIY Breakdown
If your home has standard wiring and a C-wire already in place, the labour cost of installing a smart thermostat yourself is exactly $0. You buy the thermostat. You install it. Done.
The average DIY installation takes 20 to 45 minutes. No qualifications needed. No specialist tools required beyond what most people already own.
What you will actually need:
- Phillips screwdriver, usually a number one or two
- Smartphone for the app and for photographing your existing wiring before removing anything
- Level, often included with the thermostat itself
- Drill, only needed if old screw holes do not align
- C-wire adapter if your home needs one, $15 to $25
- A patient attitude. Optional but strongly recommended
Full DIY cost breakdown:
| Item | Cost | Notes |
|---|---|---|
| The thermostat | $55 to $260 | Depends on model chosen |
| C-wire adapter if needed | $15 to $25 | Adds about 10 minutes to install |
| Basic tools | $0 to $20 | Most people already own these |
Total typical DIY cost beyond the thermostat itself: $0 to $25.
Smart thermostat installation cost at the DIY level is genuinely that low for most homes. According to manufacturer data, over 85 percent of installations are completed successfully by homeowners without professional help. The most common stumbling block is the C-wire situation, which you have already read about. You are already ahead of most people.
The manufacturers have genuinely invested heavily in making this accessible. The guided app installations from Nest, Ecobee and Amazon are legitimately good. Clear instructions, step-by-step wiring diagrams and customer support lines specifically for installation queries. They want you to succeed at this. Returns are expensive for everyone.
Want the full walkthrough from start to finish? Our complete DIY installation guide is here.
Professional Installation: What It Actually Costs
Sometimes professional installation is absolutely the right call. When it is, knowing the numbers prevents the kind of invoice surprise that ruins an otherwise good Tuesday.
HVAC technician: $100 to $200
Most smart thermostat manufacturers recommend a qualified HVAC technician over a general electrician and for good reason. HVAC technicians understand heating and cooling systems, wiring configurations and compatibility in ways that general electricians sometimes simply do not.
A typical visit covers removing the old thermostat, checking wiring compatibility, installing the new device, configuring basic settings and testing the whole system. Most take under an hour.
According to RepairPal the average HVAC technician charges between $75 and $150 per hour. Add a call-out fee of $50 to $100 in some areas and a straightforward installation typically lands between $100 and $200 total.
Electrician: $150 to $300
A licensed electrician can install a smart thermostat but will typically charge more than an HVAC technician for the same job. Calling an electrician for a standard thermostat swap is a bit like hiring a surgeon to remove a splinter. Technically qualified. Probably unnecessary. Noticeably more expensive. For homes requiring new wiring or complex electrical work an electrician becomes the right choice. For a basic swap, probably not.
Complex installations: $200 to $500+
Certain situations push costs significantly higher. Homes with no C-wire requiring a completely new wire run through walls. Multi-zone HVAC systems needing multiple thermostats configured together. Heat pumps with auxiliary heat requiring specialist configuration. Very old wiring that needs updating before a smart thermostat can operate safely.
Smart thermostat installation cost varies widely depending on your wiring, system type and whether a C-wire is already available. If your home falls into any of these complex categories get a professional quote before purchasing the thermostat. Opening the box and discovering your wiring is significantly more complicated than expected is a genuinely deflating experience.
Flat Rate vs Hourly: The Question That Can Save You $50
Here is something most thermostat guides never mention. Some HVAC companies charge a flat rate. Others charge hourly. The difference matters more than most people realise.
| Pricing Model | Typical Cost | Best For |
|---|---|---|
| Flat rate | $100 to $150 for standard swap | Straightforward installations |
| Hourly | $75 to $150 per hour plus call-out fee | Very simple jobs only |
Flat rate is almost always better for a standard thermostat swap because you know the total upfront and there are no surprises. Hourly can work out cheaper for very simple jobs but escalates quickly the moment anything unexpected appears. And in older homes something unexpected appears more often than anyone would like.
Three questions to ask before booking anyone:
- Do you charge flat rate or hourly?
- Does your quote include the call-out or service fee?
- What happens if the installation takes longer than expected?
Getting clear answers to all three before work starts is worth the two-minute phone call. Every single time.
The Hidden Costs Nobody Warns You About
This is the section that pays for itself. These extras do not appear in any manufacturer’s installation guide but show up consistently in real buyer experiences. Consider yourself warned.
| Hidden Cost | Typical Cost | When You Might Need It |
|---|---|---|
| Wall repair and repainting | $10 to $30 | Old thermostat left marks or damage |
| WiFi extender or booster | $25 to $60 | Weak signal at thermostat location |
| Additional room sensors | $39 to $60 each | Multi-storey or large homes |
| Second professional visit | Varies | Unexpected wiring configurations |
Wall repair. Old thermostats leave marks. Most smart thermostats include a trim plate specifically to cover these. Ecobee and Honeywell PRO models are particularly generous with their backplate coverage. However if your previous thermostat was unusually large or left significant damage a small amount of filler and touch-up paint adds $10 to $30. Small price for a clean finish.
WiFi signal. Smart thermostats need a stable 2.4 GHz connection. Thermostats sit in hallways and central areas that often sit at the edge of router coverage. Nothing says smart home quite like discovering your thermostat cannot find your WiFi from twelve feet away. A booster at $25 to $60 prevents the connectivity frustrations that fill the one-star reviews of otherwise excellent thermostats. Worth checking signal strength at the thermostat location before installation day.
Room sensors. The thermostat measures temperature in one spot. If your home has noticeable temperature variation between rooms dedicated sensors placed in the rooms you actually use make a significant difference. The Ecobee SmartSensor costs around $39 and the Google Nest Temperature Sensor around $40. Not essential but genuinely transformative in larger homes.
Dealing with hot and cold spots between rooms? This guide covers every fix in detail.
DIY vs Professional: The Honest Framework
Rather than a vague answer, here is exactly how to make this decision for your specific situation.
Choose DIY if:
- Your home has a C-wire or a spare wire that can be repurposed
- Your current thermostat has standard wiring with clearly labelled terminals
- Your HVAC system is standard single-stage gas, electric or forced air
- You are comfortable following step-by-step app instructions
- You own a screwdriver and have 45 minutes free
Choose professional installation if:
- Your home has no C-wire and no spare wires available
- Your system is a multi-stage heat pump with auxiliary heat
- Your wiring looks non-standard or has been modified by a previous owner
- You have a multi-zone system needing multiple thermostats configured together
- A previous DIY attempt has already caused issues with your system
Most people reading this fall comfortably into the first category. The manufacturers have genuinely made this accessible and the app-guided installations are legitimately good.
When You Should Absolutely NOT DIY
Some situations call for professional hands and recognising them early saves more money than it costs.
Heat pump systems with auxiliary or emergency heat. More complex wiring than standard setups and incorrect installation can prevent auxiliary heat from activating when needed. Several smart thermostats have documented issues with heat pump auxiliary heat configuration. Professional setup from the start avoids a significant headache later.
No C-wire and no spare wire. Running a new C-wire through walls is straightforward for a professional and genuinely difficult for a first-timer. The wire travels from the thermostat location to the HVAC unit, sometimes through insulated walls and ceiling spaces. Not impossible but firmly in “leave it to someone who has done this before” territory.
Wiring that does not match the guide. Remove your old thermostat and the wiring bears no resemblance to any diagram in the installation guide? Stop there. Incorrect wiring can damage the HVAC control board and a control board repair costs significantly more than a professional installation visit.
After a failed first attempt. If something is not working correctly after a DIY attempt the risk of causing additional damage increases with each subsequent try. There is no shame in this whatsoever. The people who designed these thermostats also sometimes call professionals. Call one, explain what happened and let them diagnose it properly.
How to Save Money on Professional Installation
Professional installation does not have to cost full price. These strategies genuinely reduce the bill.
| Strategy | Potential Saving |
|---|---|
| Bundle with annual HVAC service visit | $50 to $100 |
| Check utility company programmes | $50 to $125, sometimes free |
| Compare at least two quotes | $50 to $100 |
| Buy the thermostat yourself | $20 to $50 markup avoided |
Bundle with your annual HVAC service. The technician is already on site. Adding a thermostat installation to an existing service visit costs them minimal additional time and usually costs you noticeably less. Ask when booking the service rather than after the technician arrives.
Check your utility provider first. Some energy providers offer subsidised or completely free installation as part of their smart thermostat rebate programmes. The same rebate that partially covers your thermostat purchase sometimes covers installation too. Worth a five-minute check before booking anyone independently.
Get two quotes minimum. Pricing varies significantly between HVAC companies. A second phone call genuinely can save $50 to $100 on identical work. Takes three minutes. Worth every second.
Buy the thermostat yourself. Some installers mark up the device price significantly when supplying it as part of a package. Purchase independently, supply it yourself and pay only for the labour.
Full Cost Picture: What You Will Actually Pay
Everything together in one honest table:
| Scenario | Thermostat | Installation | Extras | Total |
|---|---|---|---|---|
| Budget DIY with C-wire | $55 to $62 | $0 | $0 | $55 to $62 |
| Mid-range DIY, no C-wire | $100 to $150 | $0 | $20 adapter | $120 to $170 |
| Premium DIY with sensors | $240 to $260 | $0 | $40 per sensor | $280 to $340 |
| Budget with professional install | $55 to $62 | $100 to $150 | $0 | $155 to $212 |
| Premium with professional install | $240 to $260 | $100 to $200 | $0 | $340 to $460 |
A real example from actual homeowners: A verified buyer in Ohio paid $0 in labour for their Amazon Smart Thermostat. Their home had a C-wire already in place and the whole job took 25 minutes. A buyer in Texas paid $175 for professional installation of a Nest Learning Thermostat because their home had no C-wire and no spare wires available. Same thermostat category. Very different situations. Both made the right call for their circumstances.
These numbers look more manageable when you factor in energy savings. ENERGY STAR certified smart thermostats save an average of $50 per year according to EPA estimates. Most households recover the full thermostat cost within one to three years without any rebate applied.
Add energy provider rebates of $50 to $125 in eligible areas and the payback period shortens considerably. Check dsireusa.org for what is available in your area.
Full breakdown of real-world savings here.
Our Top Picks at Every Budget
Ready to choose? Here are the options worth your time:
Best budget option, drops regularly on sale — worth setting a price alert.
Like-New certified refurbished version, same warranty as new and easier on the wallet.
Mid-range with no C-wire needed, plays nicely with Google and Alexa both.
Premium AI learning with room sensors included in the box.
Best overall with air quality monitoring — the Ecobee genuinely earns its price.
Frequently Asked Questions
How much does DIY smart thermostat installation cost? For most homes nothing beyond the thermostat price. Add $15 to $25 if you need a C-wire adapter. The whole process takes 20 to 45 minutes for a standard setup. Slower if you stop to read every label twice. Faster if you have done it before.
Is professional installation worth it? For complex systems, heat pumps with auxiliary heat, or homes without any available C-wire, absolutely yes. For standard gas or electric systems with existing C-wire wiring it adds cost without meaningful benefit.
Flat rate or hourly — which is better? Flat rate is almost always better for a standard thermostat swap. You know the total upfront and there are no surprises if anything takes slightly longer than expected. Always ask which model the company uses before booking.
Can any electrician install a smart thermostat? Technically yes. An HVAC technician is usually the smarter choice because they understand heating and cooling system compatibility in ways general electricians sometimes do not. Think of it as the difference between a GP and a specialist.
What if I wire it incorrectly? Most smart thermostats detect incorrect wiring and refuse to operate rather than causing damage. However incorrect wiring can occasionally damage the HVAC control board. If your wiring looks unusual stop and call a professional before proceeding.
How long does installation take? DIY typically takes 20 to 45 minutes for a standard setup. Professional installation usually completes within an hour including system testing. Add 20 minutes if you watch three YouTube videos first.
Final Verdict
If you have been putting off upgrading because of installation worries, here is the honest truth: this is genuinely one of the easier home improvements you can make. The hardest part is usually putting down your phone after the fourth YouTube video and actually picking up the screwdriver.
For most homeowners this is a 30-minute job that costs nothing in labour. The manufacturers have genuinely made it accessible and the app-guided installations deliver on that promise consistently.
Professional installation makes clear sense for complex systems, heat pump setups with auxiliary heat, homes with no available C-wire wiring, or anyone who simply does not want the hassle. At $100 to $200 it is reasonable money for genuine peace of mind.
The single most important step is checking your wiring compatibility before purchasing anything. Five minutes with the manufacturer’s compatibility checker prevents the most common and most expensive installation problems before they even begin.
Check your wiring. Choose your thermostat. Make the installation decision that fits your actual situation rather than the idealised version. Most people will be completely fine doing this themselves. A few genuinely need professional help. Both outcomes are perfectly valid and both are covered above.
Based on RepairPal labour cost data, ENERGY STAR certification information, manufacturer documentation from Google Nest, Ecobee, Honeywell and Amazon, and verified homeowner installation experiences.
Related Guides:
- How to Install a Smart Thermostat Step by Step (2026).
- Do You Need a C-Wire for a Smart Thermostat? (2026).
- Best Smart Thermostat for Home (2026).
- Best Smart Thermostat Under $50 (2026).
- Do Smart Thermostats Save Money? (2026).
- Why Is One Room Colder or Hotter Than the Rest? (2026).
Reviewed by The Thermo Expert Team
The Thermo Expert Team researches and compares smart thermostats, heating systems, and common HVAC issues to provide clear, practical advice for homeowners. Our goal is to help you understand problems quickly and choose the right solution with confidence. Learn more about us →