Introduction
Installing a smart thermostat sounds complicated — but in most homes, it’s a 30–45 minute job you can do yourself without an electrician.
The problem? One small mistake (usually wiring or skipping prep) can stop your heating or cooling from working completely.
This step-by-step guide shows you exactly how to install a smart thermostat safely, avoid the most common mistakes, and get it working first time — even if you’ve never done DIY before.
Some links in this guide may earn us a small commission at no extra cost to you. This helps support the site so we can keep creating helpful content.
This guide applies to Nest, Ecobee, Honeywell, Amazon, and most modern smart thermostats.
How to Install a Smart Thermostat (Quick Answer)
- Turn off power at the breaker
- Remove the old thermostat and photograph the wiring
- Label and connect wires to the new thermostat
- Mount the base plate and attach the display
- Restore power and complete the app setup
Most installations take 30–45 minutes if your system is compatible.
Can You Install a Smart Thermostat Yourself?
Yes — in most homes, installing a smart thermostat is a straightforward DIY job.
If your system uses standard 24V wiring, you can usually install it yourself with basic tools and no electrical experience.
You may need professional help if you have:
- No C-wire and no spare wire available
- A high-voltage system such as electric baseboard heating
- A complex multi-stage HVAC system
For most homeowners, though, this is one of the easiest and most cost-effective upgrades you can make.
Most homes with a C-wire already in place can complete the installation in 30 to 45 minutes.
Not sure whether your home has a C-wire? Read this first: Do You Need a C-Wire for a Smart Thermostat?
How This Guide Was Researched
This guide is based on:
- Manufacturer installation documentation from Google Nest, Ecobee, Honeywell and Amazon
- Verified homeowner installation experiences
- HVAC professional discussions
- US Department of Energy guidance
- Common mistakes identified across thousands of customer reviews
Before You Start: Three Things to Check
Before you remove your old thermostat, check these three things first. This is the difference between a simple 30-minute installation and a frustrating afternoon of wiring problems, returns, and guesswork.
Check 1: Is your HVAC system compatible?
Most smart thermostats work with the majority of standard 24V home heating and cooling systems. This includes gas furnaces, central air conditioning, forced air systems and most heat pumps.
Systems that are often incompatible include electric baseboard heating which runs on 110 to 240 volts rather than the 24 volts smart thermostats require, ductless mini-split systems, and some older proprietary heating systems that were designed before smart thermostats existed and have not caught up since.
Every major brand provides a free compatibility checker on their website. Spend five minutes there before ordering anything. It is the single most effective way to avoid an awkward conversation at the returns desk.
Check 2: Does your home have a C-wire?
The C-wire is the question that has launched a thousand forum posts, caused countless returned thermostats, and generated more confused reviews than almost any other issue.
Not sure what a C-wire actually is or whether you need one? Full step-by-step solutions are covered here: Do You Need a C-Wire for a Smart Thermostat?
The C-wire, short for common wire, provides continuous power to your smart thermostat. Most modern smart thermostats need one.
Remove your existing thermostat faceplate and look at the wiring. If a wire connects to a terminal labelled C you are in excellent shape. If that terminal is empty check whether a spare wire is tucked unused into the wall. Most homes built after 1990 have one sitting there doing absolutely nothing, just waiting for its moment to be useful.
Pro Tip: Before buying a C-wire adapter check inside the wall cavity behind your thermostat. Many homes have a spare wire already present that was simply never connected. Pull the wires out a little further and count them. If there are more wires than terminals in use one of them may already be your C-wire solution at zero extra cost.
No C-wire at all? You still have options. Read the full guide here: Do You Need a C-Wire for a Smart Thermostat?
If you prefer a visual walkthrough, you can also watch a step-by-step installation video before you begin.
Check 3: Do you have everything you need?
Gathering your tools before starting means you are not halfway through the job discovering you need a drill that is in the garage under three boxes from the last time you moved.
Tools required:
- Phillips screwdriver, usually a number one or two
- Smartphone for photographing existing wiring and running the setup app
- Level, often included with the thermostat
- Drill, only needed if the old screw holes do not align with the new base plate
- Wire labels, included with most thermostats
- A cup of tea or coffee (technically optional but strongly recommended)
How Much Does Smart Thermostat Installation Cost?
In most homes, installing a smart thermostat costs between $60 and $260 if you do it yourself.
However, a few additional costs can catch people off guard, so it’s worth understanding the full picture before you start.
| Item | Cost |
|---|---|
| Smart thermostat | $55 to $260 depending on model |
| C-wire adapter (if needed) | $15 to $25 |
| Basic tools | $0 to $20 (most people already own these) |
| Professional installation (optional) | $100 to $200 |
For most homeowners, the only real cost is the thermostat itself. Everything else is either included in the box or already sitting in a drawer somewhere. Want a full breakdown of DIY vs professional costs (and when it’s actually worth paying)? Read this: Smart Thermostat Installation Cost (DIY vs Professional)
Step by Step: How to Install a Smart Thermostat
Follow these steps in order to install your smart thermostat safely and correctly:
- Turn off the power
- Remove the old thermostat
- Photograph and label the wiring
- Install the new base plate
- Connect the wires
- Attach the display and restore power
- Complete the app setup
Right then. Tools assembled, thermostat unboxed, tea poured. Here we go.
Step 1: Turn the Power Off
Find the circuit breaker controlling your HVAC system and switch it off. Confirm the existing thermostat display goes dark before touching anything.
This step is non-negotiable. Even though the system runs on low voltage, working on live wiring can damage your HVAC system and lead to costly repairs.
While you are at the breaker box note which breakers control the indoor air handler and the outdoor condenser separately. Both should be off before you start.
Pro Tip: Take a quick photo of your breaker box with the correct breakers switched off before walking back to the thermostat. If you get interrupted mid-installation and forget which breakers you flipped, the photo saves you from guessing when it is time to restore power.
Step 2: Remove the Old Thermostat Faceplate
Most thermostat faceplates clip onto a wall-mounted base and pull straight off. Some have a small tab or button to press before pulling. Gentle firm pressure is usually all it takes.
If your old thermostat has been on the wall since approximately 1987 it may be stuck in place after years on the wall. Be patient. It will come off.
Do not pull the wires when removing the faceplate. The wires connect to terminals on the base beneath the faceplate, not to the faceplate itself.
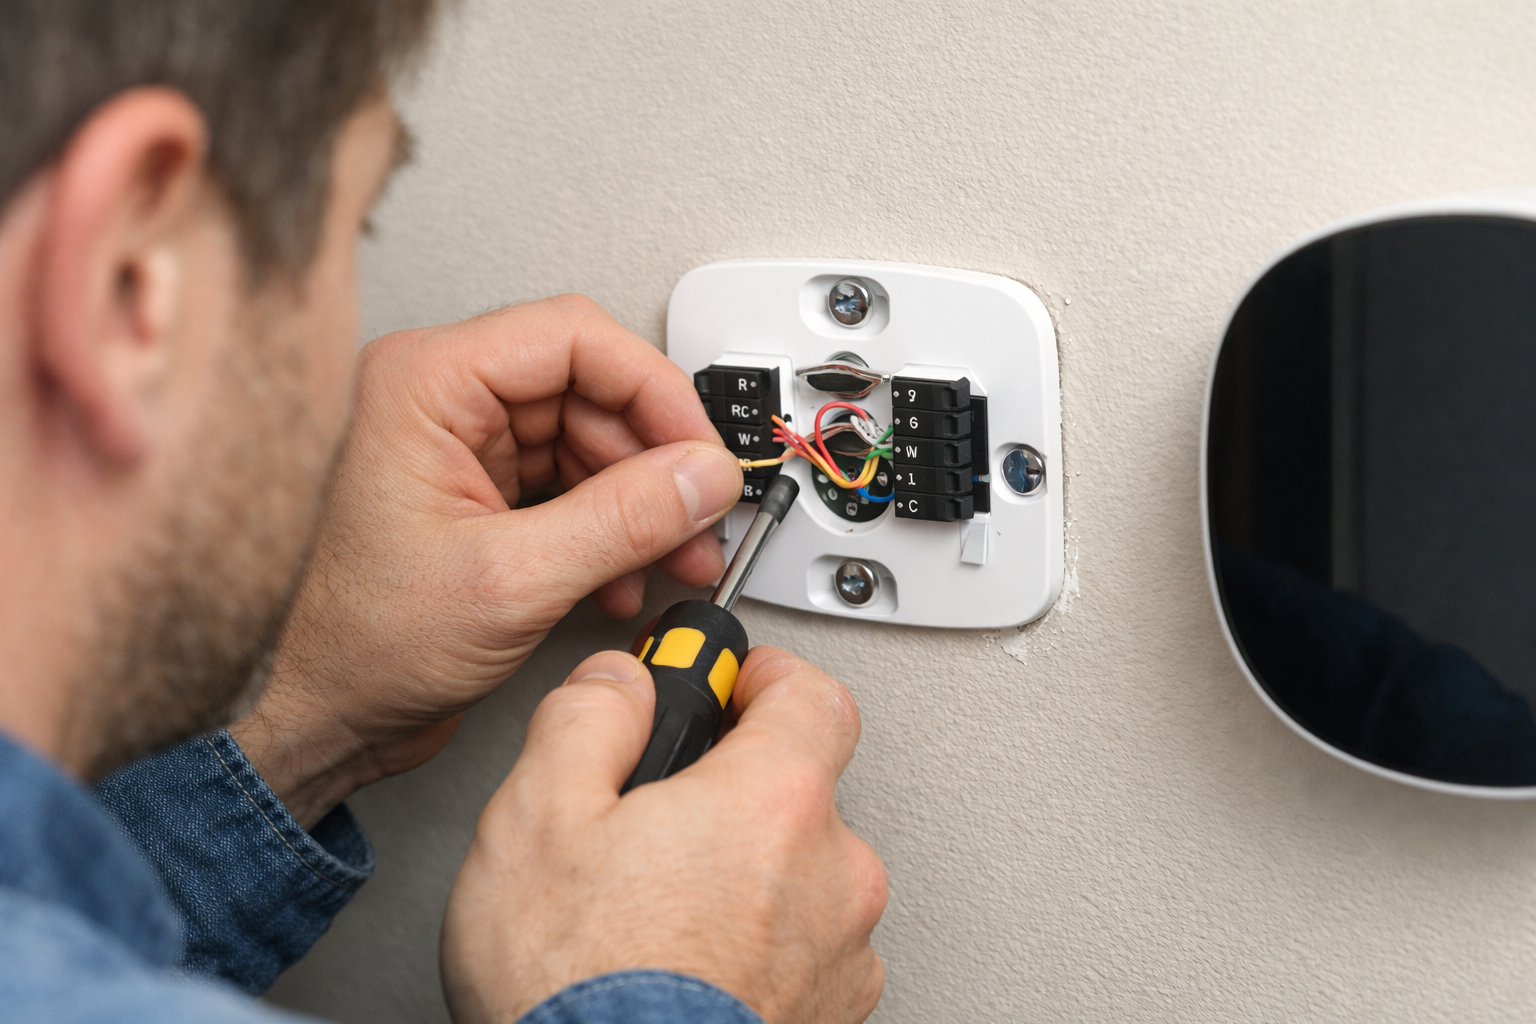
Step 3: Photograph Everything Before Touching Anything
Stop. Before touching anything, take a clear photograph of your wiring.
Take a clear photograph of every wire and every terminal label before removing anything. This photo is your reference if anything goes wrong later. Skipping this step is one of the most common causes of installation problems.
The number of people who skip this step, disconnect the wires, and then spend 45 minutes trying to remember which wire went where is genuinely remarkable. The photograph takes 15 seconds. The alternative takes considerably longer and involves significantly more stress.
Take the photograph. Then take another one. If you want to avoid the most common mistakes, see: Smart Thermostat Installation Mistakes (2026)
Pro Tip: Send the photograph to your own email or save it to the cloud immediately after taking it. If your phone battery dies mid-installation you still have the wiring reference accessible from any device. It takes ten seconds and has saved more than a few installations from becoming genuine disasters.
Step 4: Label the Wires
Your new thermostat includes small wire labels — use them. They are there for a reason. Use them.
Label each wire with its terminal letter before removing it from the old base. Remove and connect one wire at a time, matching it to the correct terminal on the new thermostat. Never disconnect all wires at once unless you enjoy puzzles with no answer key.
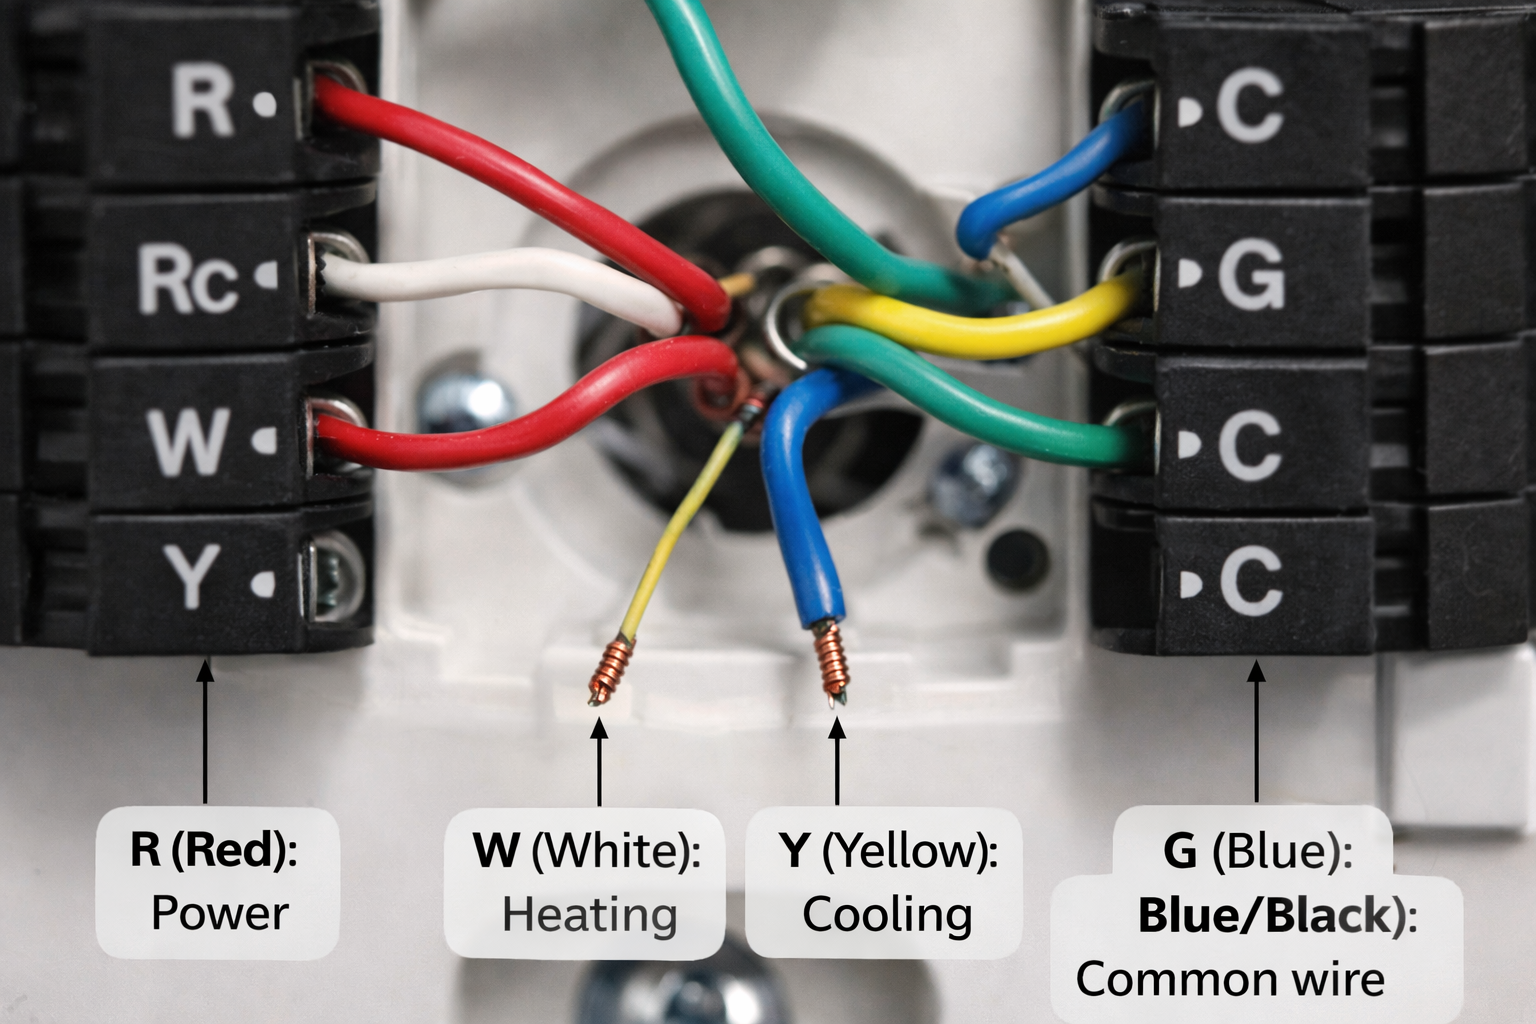
Common terminal labels and what they mean:
| Terminal | Colour Usually | Function |
|---|---|---|
| R or Rc | Red | Power from transformer |
| W | White | Heating |
| Y | Yellow | Cooling |
| G | Green | Fan |
| C | Blue or Black | Common wire, continuous power |
| O or B | Orange or Blue | Heat pump reversing valve |
Important: Wire colours are not always standard. A previous owner, a creative installer, or a particularly confusing renovation may have used whatever colour was available at the time. Always rely on the terminal label rather than the wire colour. Always rely on the terminal label, not the wire colour.
Pro Tip: If the wire labels in the box are too small to write on clearly, wrap a small strip of masking tape around each wire instead. Larger surface, easier to read, and just as effective. Most people have masking tape somewhere and it takes about 30 seconds to do properly.
Step 5: Remove the Old Base Plate
Unscrew the old mounting base from the wall. The wires feed through a hole in the wall behind it. Hold onto the wires as you remove the base so they don’t slip back into the wall.
If the wires look like they might slide back into the wall, tape them temporarily to the wall while you work. Fishing wires back out of a wall cavity is one of those experiences that is character building in hindsight and genuinely infuriating in the moment.
Step 6: Install the New Base Plate
Feed the wires through the central hole in your new thermostat’s base plate. Hold the base plate against the wall and use the built-in bubble level to ensure it is straight before marking and drilling fixing holes.
A crooked thermostat is the kind of thing you stop noticing after a week and then notice forever the moment a guest points it out. Take an extra 30 seconds to get it level.
If the old screw holes align with the new base plate, use them. If not mark new positions and drill. Most walls only need the small wall anchors included with the thermostat.
Pro Tip: If your wall is plasterboard and the new screw positions do not hit a stud, use the plastic wall anchors included with the thermostat rather than screwing directly into the plasterboard. This prevents the base plate from loosening over time and only takes a few extra seconds to do properly.
Step 7: Connect the Wires
Referring to your photograph from Step 3 and the labels you applied in Step 4, connect each wire to its corresponding terminal on the new base plate.
Push each wire firmly into its terminal until you feel or hear a small click confirming it is secure. A loose connection can cause the thermostat to power on but fail to control heating or cooling properly — everything looks fine, but nothing actually works.
Typical wiring for a standard single-stage system:
| Wire | Terminal |
|---|---|
| Red | R or Rc |
| White | W |
| Yellow | Y |
| Green | G |
| Blue or Black | C |
Double check every connection against your photograph before moving on. This is the moment where rushing creates problems that take hours to diagnose.
Pro Tip: After connecting each, wire give it a gentle tug to confirm it is properly seated. A wire that pulls out easily was never properly connected and would have caused problems the moment power was restored. This five-second check per wire prevents the most common post-installation headache.
Step 8: Attach the Display
Snap or clip the thermostat display onto the mounted base plate. Most smart thermostats connect magnetically or with a simple clip mechanism. You should feel a satisfying click when the display is properly seated.
If it does not click or feels loose check the alignment and try again. A properly seated display should feel solid and secure, not wobbly.
Step 9: Restore Power
Return to the breaker box and switch the HVAC circuit breakers back on. Then do something that goes against every instinct you have after 30 minutes of focused work: wait a full 60 seconds before touching the thermostat screen.
Some systems need a moment to fully power up. Impatient button-pressing during startup can confuse the initial setup sequence and cause the thermostat to behave oddly. Sixty seconds. Put the kettle on. You have earned it.
Your thermostat display should illuminate and show a startup screen or welcome message. If it does, congratulations. The hard part is done.
Pro Tip: If your thermostat display does not light up after 60 seconds check that the display is properly clicked onto the base plate before heading back to the breaker box. A display that is not fully seated will not power on even with everything else wired perfectly. It is the simplest fix and the one most people overlook first.
Step 10: Complete the App Setup
Download the manufacturer’s app on your smartphone if you have not already and follow the guided setup process. Every major brand has a dedicated setup app that walks you through the remaining configuration clearly and in plain English.
Key things to configure:
- Connect to your home WiFi
- Confirm your HVAC system type
- Set your schedule (don’t leave defaults)
- Adjust Home, Away and Sleep temperatures
- Set up remote sensors if included
This is where most people make a mistake. After installation, they rush through the app setup and plan to fix it later.
Later never comes. The thermostat works, but schedules and settings are wrong — leading to confusion and poor performance.
Take 20 minutes to set it up properly now. You won’t need to revisit it.
Pro Tip: Before finishing the app setup take a screenshot of the final settings screen showing your system type configuration. If you ever need to factory reset the thermostat or replace it in the future this screenshot saves you from having to remember your system details or look them up again. Thirty seconds now, potentially hours saved later.
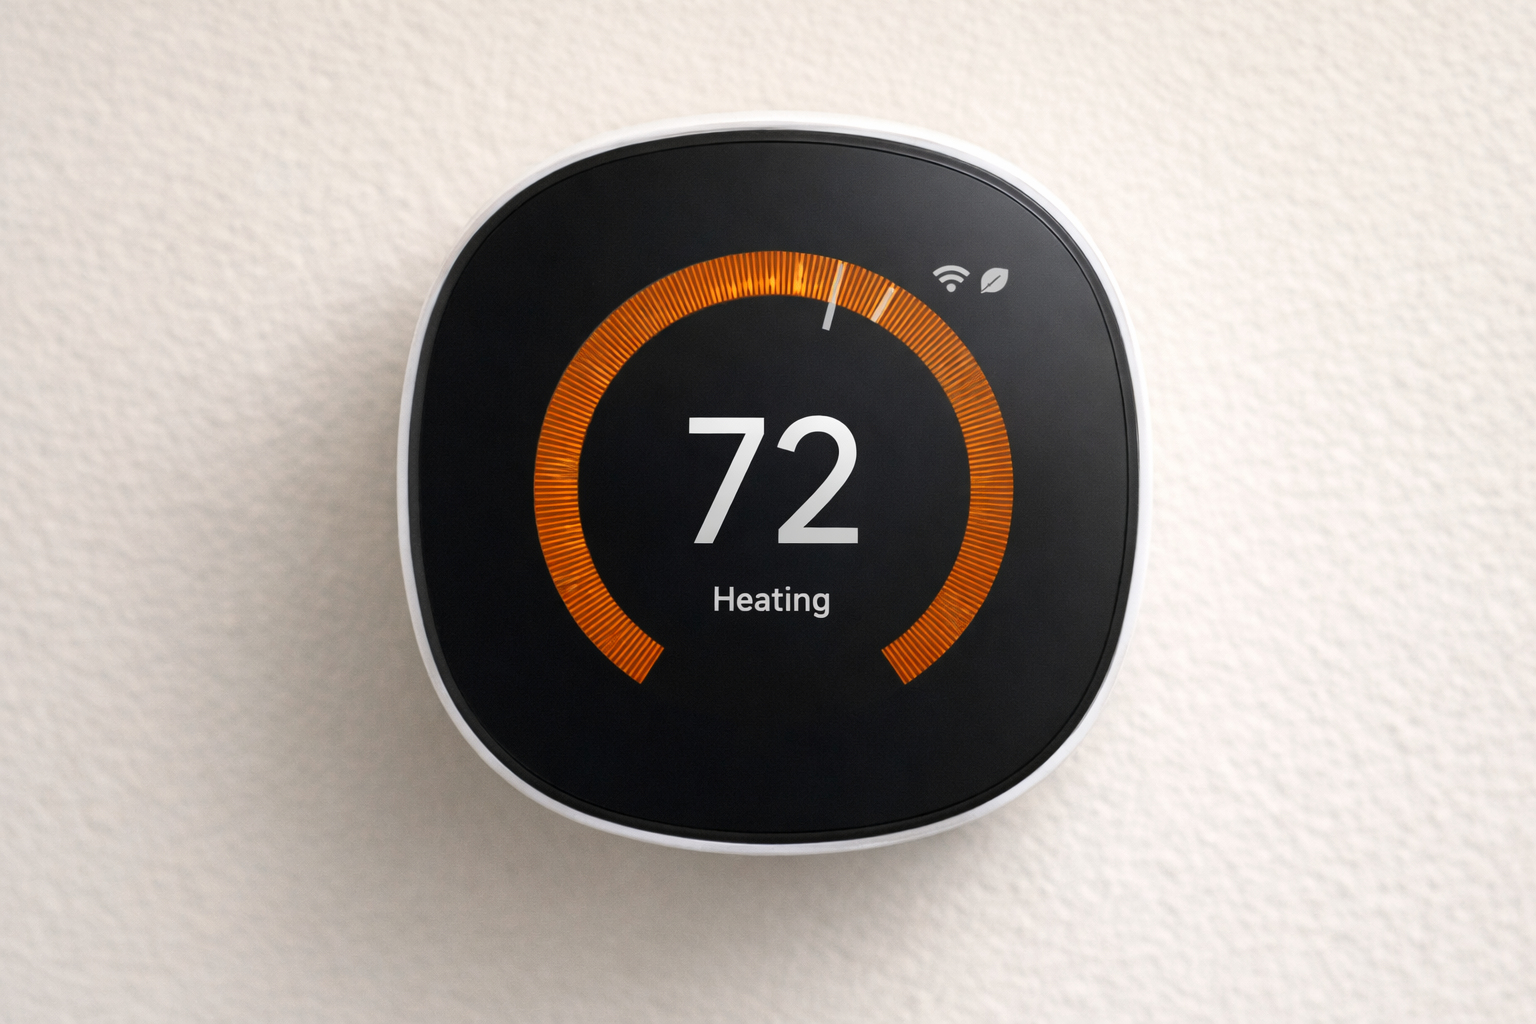
This is what your smart thermostat should look like once installation is complete — fully powered, connected, and ready to control your home.
No C-Wire? Here Is Exactly What to Do
No C-wire is not the installation-ending catastrophe some forum posts make it sound. It is a common situation with several straightforward solutions.
Option 1: Choose a thermostat that handles it for you
The Ecobee Smart Thermostat Premium includes a Power Extender Kit that installs at your furnace and eliminates the C-wire requirement entirely. It is an excellent thermostat for many other reasons too and worth considering if your home lacks a C-wire.
Check the Ecobee Smart Thermostat Premium on Amazon.
Best option if you don’t want to deal with wiring at all.
Option 2: Install a C-wire adapter
A 24V C-wire adapter plugs into a spare outlet near your HVAC unit and provides the continuous power your thermostat needs. Costs $15 to $25, takes around 10 minutes to install, and provides a permanent solution.
Option 3: Repurpose a spare wire
If your thermostat wiring cable contains an unused wire, which is surprisingly common in homes built after 1990, that wire can be connected to the C terminal at both the thermostat and the HVAC control board to serve as a C-wire. No additional purchase required. Just use the spare wire already in your system.
Full step-by-step solutions are covered here: Do You Need a C-Wire for a Smart Thermostat? In addition, this Amazon Live video shows a step-by-step example of installing a C-wire for a smart thermostat.
Troubleshooting: Common Problems
Thermostat display stays blank
Check the breaker has reset. Reattach the display and confirm all wires are fully seated.
System does not heat or cool
Confirm system type in the app, check wiring against your photo, and make sure both breakers are on.
WiFi connection fails
Ensure your router supports 2.4 GHz. Most thermostats do not work with 5 GHz networks.
Incorrect temperature readings
Allow 30 minutes for stabilisation. Adjust temperature offset in settings if needed.
Pro Tip: If your thermostat is reading accurately but your home still feels the wrong temperature check the thermostat location. A thermostat in direct sunlight, near a supply vent, or in a drafty hallway will give accurate readings for its immediate environment but those readings may not reflect the temperature in the rooms you actually spend time in. Location matters as much as accuracy.
When You Should Call a Professional
Call a qualified HVAC technician if:
- Your wiring does not match any diagram
- You have a multi-stage heat pump system
- There is no C-wire and no spare wire available
- A DIY attempt has caused the system to stop working
There is no shame in calling a professional for complex setups. It often saves time, money, and frustration. Even professionals call in help when systems get complex — knowing when to stop is part of doing the job properly.
Professional installation costs between $100 and $200 for a standard setup. Full cost breakdown can be found in our guide: Smart Thermostat Installation Cost..
Our Top Smart Thermostat Picks
Not sure which thermostat to install? Here are three honest recommendations covering every budget:
Best Overall — Google Nest Learning Thermostat
Smart, reliable, and learns your schedule automatically within a week. One of the most popular upgrades for homeowners.
Best Budget — Amazon Smart Thermostat
Affordable, ENERGY STAR certified, and built on Honeywell Home technology. Ideal for Alexa users.
Best Premium — Ecobee Smart Thermostat Premium
Includes room sensors, air quality monitoring, built-in Alexa, and a Power Extender Kit for homes without a C-wire.
See our full comparison guide: Best Smart Thermostat for Home (2026)
Frequently Asked Questions
How long does smart thermostat installation take?
For most homes with standard wiring and a C-wire already in place the installation takes 20 to 45 minutes. Homes requiring a C-wire adapter or with non-standard wiring may take up to 90 minutes. Add another 20 minutes if you watch three YouTube videos first which most people do.
Do I need an electrician to install a smart thermostat?
No for the vast majority of homes. Smart thermostats run on 24 volt low voltage wiring that most homeowners can work with safely following the manufacturer’s app guidance. An electrician or HVAC technician is only needed for genuinely complex wiring situations.
What if I wire it incorrectly?
Most smart thermostats detect incorrect wiring and refuse to operate rather than causing damage. However incorrect wiring can occasionally damage the HVAC control board. Photograph your existing wiring before removing anything and follow the app guide precisely rather than guessing.
Can I install a smart thermostat without a C-wire?
Yes – absolutely. The Ecobee includes a Power Extender Kit, the Nest works without a C-wire in most homes, and separate C-wire adapters are available for $15 to $25. See full guide: Do You Need a C-Wire for a Smart Thermostat.
What tools do I need?
A Phillips screwdriver, your smartphone, and the wire labels included with your thermostat. A level and drill may be needed depending on your wall type and whether existing screw holes align with your new base plate.
Will my smart thermostat save money?
According to ENERGY STAR, certified smart thermostats save an average of $50 per year on energy bills. Many energy providers also offer rebates of $50 to $125 for qualifying models. See full independent savings breakdown: Do Smart Thermostats Save Money?.
What is the most common installation mistake?
Not checking for a C-wire before purchasing the thermostat. This single oversight accounts for the majority of failed installations and returned devices. Always check your existing wiring before ordering anything. Our full guide on common installation mistakes covers every one worth knowing about.
Final Verdict
Installing a smart thermostat is genuinely one of the most accessible home improvements available in 2026. The manufacturers have invested seriously in making the process straightforward and the guided app installations deliver on that promise consistently for the vast majority of homeowners.
Prepare properly. Photograph your wiring before touching it. Turn the breaker off. Follow the app guide rather than guessing. Complete the full setup on installation day rather than convincing yourself you will definitely do it properly later.
The hardest part is usually getting started. Once you do, the rest is surprisingly straightforward.
Thirty minutes from now you could have a smart thermostat on your wall, a slightly smug sense of achievement, and $100 to $200 still in your pocket that would otherwise have gone to an installation fee.
Not a bad return on one Saturday morning.
Based on manufacturer installation documentation from Google Nest, Ecobee, Honeywell and Amazon, analysis of verified homeowner installation experiences, HVAC professional forum discussions, and US Department of Energy guidance.
Related Guides:
Best Smart Thermostat Under $50 (2026).
Smart Thermostat Installation Cost (2026).
Smart Thermostat Installation Mistakes (2026).
Do You Need a C-Wire for a Smart Thermostat? (2026).
Best Smart Thermostat for Home (2026).
Do Smart Thermostats Save Money? (2026).
Reviewed by The Thermo Expert Team
The Thermo Expert Team researches and compares smart thermostats, heating systems, and common HVAC issues to provide clear, practical advice for homeowners. Our goal is to help you understand problems quickly and choose the right solution with confidence.