The Ultimate Guide to Using a Thermos
Unlock the full potential of your insulated flask. From piping hot coffee on a chilly morning to ice-cold lemonade on a summer day, we’ll show you how to master your thermos for perfect temperature retention, every time.
Key Takeaways
- Pre-treatment is crucial: Always pre-heat your thermos with boiling water for hot contents, or pre-chill with ice water for cold contents.
- Fill it up: A full thermos retains temperature better than a partially filled one due to less air space.
- Proper cleaning prevents odors: Regular washing with soap and water, plus occasional deep cleaning, is essential for longevity and taste.
- The right thermos matters: Choose a size and lid style that matches your daily needs for the best experience.
The Science of a Thermos: How Does It Work?
Before we dive into the “how-to,” let’s appreciate the simple genius behind a thermos, also known as a vacuum flask. Its effectiveness comes down to combating three types of heat transfer:
- Conduction: Heat transfer through direct contact. The vacuum gap between the inner and outer walls of the thermos prevents heat from being conducted outwards.
- Convection: Heat transfer through the movement of air or liquid. The vacuum (which is empty space) has no air, so convection cannot occur. The sealed lid prevents air from escaping or entering.
- Radiation: Heat transfer via electromagnetic waves. The inner chamber is typically coated with a reflective layer (like silver) to reflect heat radiation back into the contents (for hot liquids) or away from the contents (for cold liquids).
In essence, a thermos creates a fortress against temperature change, trapping the “hot” or “cold” inside by creating a buffer of nothingness. Understanding this helps you use it more effectively.
How to Use a Thermos: An Interactive Guide
Using a thermos is more than just pouring liquid in and closing the lid. Follow these steps for maximum performance, whether you’re preserving a hot soup or a chilled smoothie.
Step 1: Pre-Treat Your Thermos (The Most Important Step)
Never skip this! For hot contents, fill the thermos with boiling water. For cold contents, fill it with ice water. Seal the thermos and let it sit for 5-10 minutes. This brings the inner wall to the target temperature, so your drink doesn’t waste energy heating or cooling the steel itself.
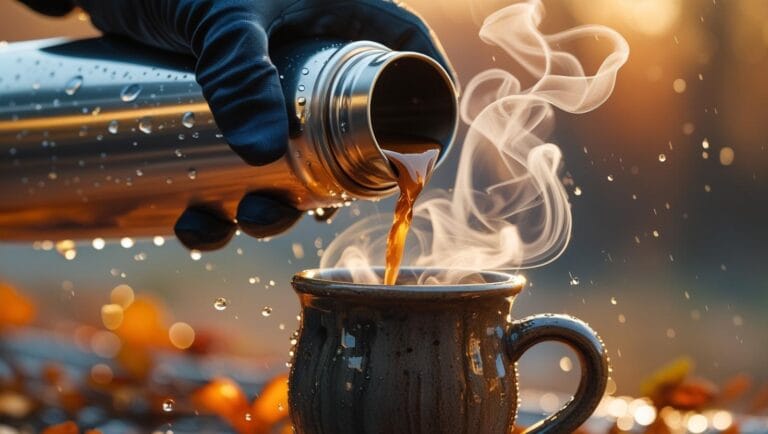
Step 2: Empty and Fill Immediately
Quickly discard the pre-treating water. Without delay, fill the thermos with your piping hot coffee, soup, or ice-cold beverage. The less time the thermos sits empty, the better it will maintain its pre-treated temperature.
Step 3: Fill to the Right Level
For best results, fill the thermos to about an inch below the bottom of the stopper threads. A fuller thermos has less air, and air is the enemy of temperature retention. However, don’t overfill, as it can cause leaks or pressure build-up.
Step 4: Secure the Lid Tightly
This might seem obvious, but a poorly sealed lid is the most common point of failure. Ensure the threads are clean and the lid is screwed on firmly and evenly. This traps the heat (or cold) and prevents convection and evaporation.
Step 5: Keep It Closed
Every time you open your thermos, you release trapped heat or let warm air in. Try to resist the urge to check on your drink. If you have a thermos with a pour-through stopper, use it! It allows you to pour without fully removing the lid, preserving the temperature for much longer.
What Can You Put in a Thermos? (It’s Not Just for Coffee)
While coffee and tea are classics, your thermos is a versatile culinary tool. Here are some ideas:
- Hot Foods: Soups, stews, chili, oatmeal, hot dogs in hot water, or even cooked pasta with sauce.
- Cold Foods: Gazpacho, fruit smoothies, yogurt parfaits, iced coffee, or milk.
- Creative Uses: Use it to “cook” foods that just need hydration, like ramen noodles or couscous. Add the dry ingredient, pour in boiling water, seal, and let it sit for the required time.
Cleaning and Maintenance: The Secret to a Long-Lasting Flask
A clean thermos is a happy thermos. Neglect can lead to stubborn stains, lingering odors, and a compromised taste.
Daily Cleaning:
After each use, rinse your thermos with warm water. Use a bottle brush with a bit of mild dish soap to scrub the inside. Rinse thoroughly and let it air dry completely with the lid off to prevent moisture from getting trapped.
Deep Cleaning (For Stains and Odors):
For a more thorough clean, try one of these methods:
- Baking Soda and Vinegar: Add a couple of tablespoons of baking soda to your thermos, then fill it halfway with white vinegar. It will fizz. Top it off with hot water, seal, and let it sit for a few hours or overnight. Scrub and rinse thoroughly.
- Denture Cleaning Tablets: These are designed to remove tough stains (like coffee and tea) and kill bacteria. Drop one or two tablets into your thermos, fill with warm water, and let it sit for a few hours before rinsing.
Important: Never use bleach, as it can damage the stainless steel and its welds. Avoid putting your thermos in the dishwasher unless the manufacturer explicitly states it’s dishwasher-safe, as high heat can damage the vacuum seal.
Our Top Thermos Recommendations from Amazon US
Choosing the right thermos is the first step. Here are three top-rated, field-tested options that excel in durability, performance, and design.

Stanley Classic Legendary Bottle (1.5 qt)
The undisputed king of durability. This is the thermos your grandfather used, and for good reason. It’s built like a tank, has incredible insulation (keeps drinks hot or cold for 32 hours), and the insulated lid doubles as a cup. A true classic.
Check Price on Amazon
Hydro Flask Wide Mouth (32 oz)
A modern icon known for its sleek design, vibrant colors, and excellent performance. The TempShield insulation keeps beverages cold for up to 24 hours and hot for up to 12. The wide mouth makes it easy to clean and add ice cubes.
Check Price on Amazon
Thermos Stainless King (40 oz)
From the brand that started it all. The Stainless King lives up to its name with superior vacuum insulation technology that keeps contents hot or cold for 24 hours. Features a convenient twist and pour stopper and a built-in serving cup.
Check Price on AmazonFrequently Asked Questions (FAQ)
Why is my thermos not keeping things hot?
The most common reasons are: 1) You didn’t pre-heat it with boiling water first. 2) The lid is not sealed properly or the seal is damaged. 3) The vacuum seal of the thermos itself is broken (you can often tell if the outside of the thermos gets warm to the touch). 4) It’s not full enough, leaving too much air inside.
Can I put carbonated drinks in a thermos?
It’s generally not recommended. The carbonation can build up significant pressure inside the sealed container, making it difficult to open and potentially causing the lid to pop off forcefully upon opening. Stick to non-carbonated beverages for safety.
Is it safe to put milk in a thermos?
Yes, but with caution. You can keep milk cold for many hours, but hot milk can be a breeding ground for bacteria if it drops into the “danger zone” (40°F – 140°F or 4°C – 60°C) for too long. For hot chocolate or lattes, consume within a few hours and ensure the thermos is cleaned thoroughly afterward.


